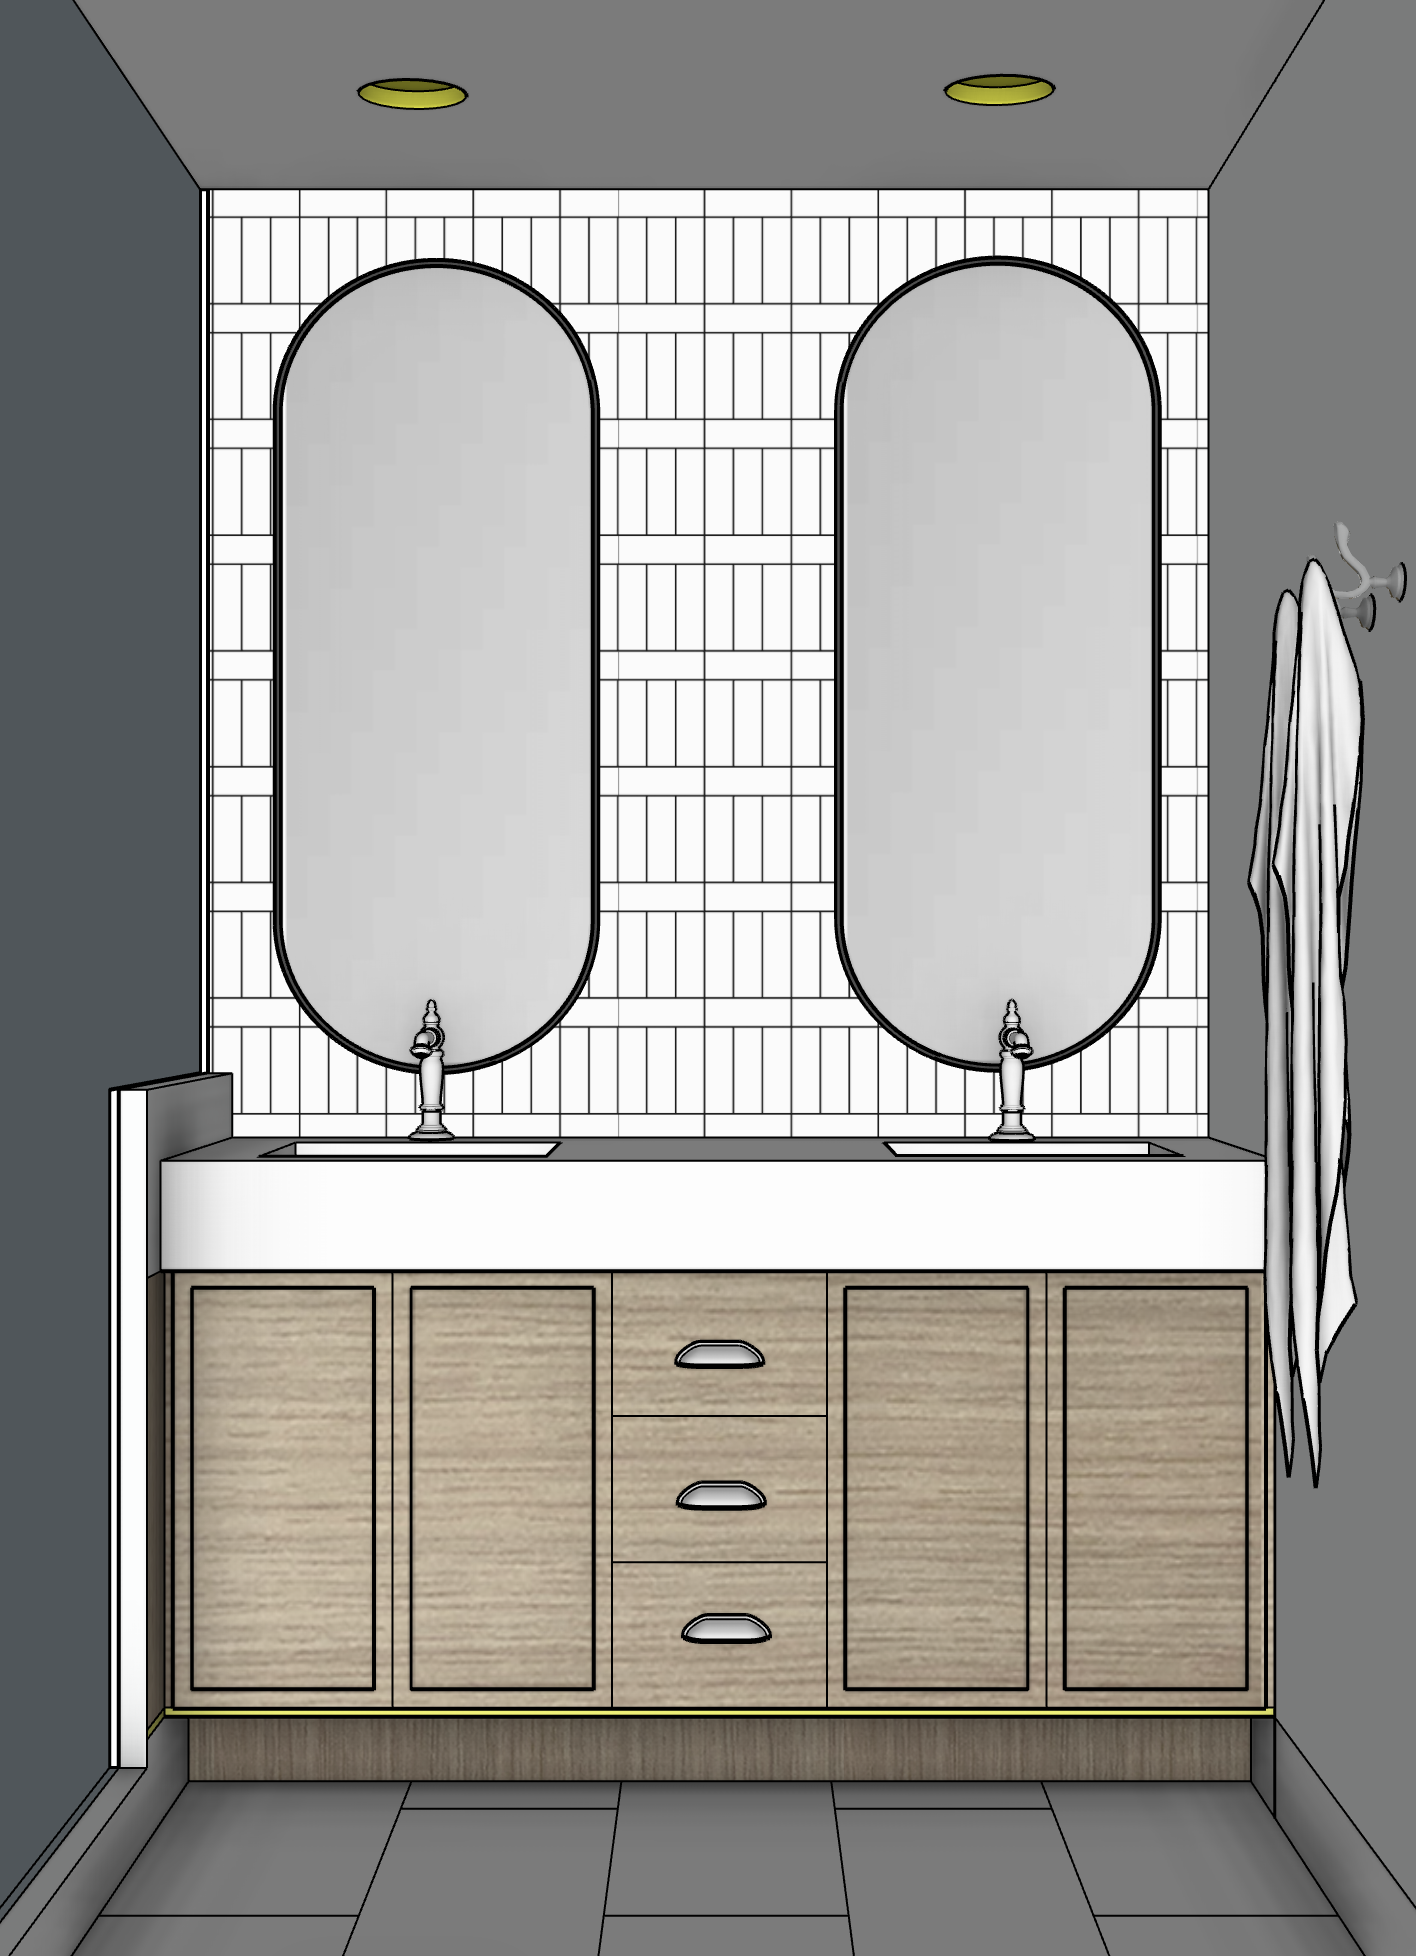
use the attached elevation as the strict geometry and composition reference create a highly photorealistic architectural rendering of the primary bathroom vanity exactly as drawn this is a visualization and material realism exercise only do not redesign reinterpret simplify add remove resize or reposition any architectural or cabinetry element geometry lock preserve the source drawing exactly in camera position straight on elevation viewpoint framing wall proportions ceiling height floor plane vanity width and height cabinet configuration drawer and door sizes countertop thickness backsplash condition medicine cabinet dimensions and locations plumbing locations lighting locations shower knee wall shower glass towel hooks and all surrounding architectural relationships the source drawing is the geometry authority maintain the exact number size location and proportions of all cabinet doors and drawers do not change the vanity design or introduce additional cabinetry shelving trim fixtures accessories or decorative elements rendering instructions vanity cabinetry render the vanity in natural rift cut white oak with vertically oriented straight consistent grain use a refined light to medium natural white oak tone with subtle warmth and a matte furniture quality finish preserve realistic wood grain scale avoid yellow orange rustic knotty heavily figured or exaggerated wood grain countertop backsplash render the countertop in a refined light natural stone with a warm white to soft ivory base and restrained subtle movement the stone should feel modern and sophisticated rather than dramatically veined preserve the countertop geometry exactly as drawn do not introduce bold gray veining high contrast or busy movement wall tile render the wall in riad style bright white 2 6 thin bejmat zellige tile the tile must read as authentic handmade zellige rather than conventional ceramic subway tile show subtle irregularity in tile faces and edges gently undulating reflective glaze slight variation in white and warm ivory tones and natural handmade character without becoming rustic or distressed follow the tile layout shown in the source drawing exactly alternate one complete course of vertically oriented 2 6 tiles followed by one complete course of horizontally oriented 2 6 tiles repeating consistently across the wall maintain this pattern precisely use narrow understated grout joints that visually blend with the bright white tile medicine cabinets the two rectangular mirrors are recessed medicine cabinets preserve their exact dimensions and positions they should read as clean frameless mirrored medicine cabinets integrated into the tiled wall with minimal visible perimeter detailing faucets render the two faucets as kohler artifacts widespread faucets in polished nickel preserve the locations and proportions shown polished nickel should have a warm refined reflective quality and should not read as chrome or brushed nickel cabinet hardware all cabinet hardware is polished nickel use polished nickel cup pulls on drawer fronts and polished nickel handles on cabinet doors maintain the hardware locations shown in the source drawing do not substitute knobs or other hardware styles shower condition at the left side preserve the shower knee wall and frameless clear glass panel exactly as shown the glass should rise cleanly from the knee wall and appear optically clear with realistic subtle reflections and edge definition do not introduce a framed shower enclosure or unnecessary metal channels towel area preserve the wall hooks and hanging towels on the right exactly in their indicated location keep styling minimal and realistic floor render the primary bathroom floor using the selected materia blanco 12 40 tile install the rectangular tile side to side in a 50 offset pattern with arctic white grout the floor should have a sophisticated pale neutral appearance and realistic material texture without competing visually with the handmade zellige wall lighting photography preserve the two decorative fixtures located above the medicine cabinets exactly where shown render them as warm architectural lighting appropriate to the design include the concealed led toe kick lighting beneath the vanity exactly as indicated it should create a very soft controlled wash of warm light across the floor immediately beneath the cabinetry do not exaggerate the brightness or create a glowing floating vanity effect use balanced architectural photography exposure with realistic interior illumination preserve highlight detail in the polished nickel mirrors glazed zellige and stone maintain visible shadow depth and realistic contrast avoid blown highlights washed out white surfaces excessive ambient brightness or real estate photography lighting material readability is more important than overall brightness use an editorial architectural photography finish with realistic lens behavior crisp architectural edges natural reflections accurate material scale and subtle depth global constraints do not change the geometry or design do not change cabinet proportions or configuration do not change the tile layout do not replace the handmade zellige with conventional ceramic subway tile do not add decorative objects artwork plants rugs accessories additional lighting additional hardware or architectural details not shown in the source do not introduce schluter trim or decorative tile edging avoid ai artifacts including speckling mottling smeared textures repeating tile or wood patterns warped grout lines distorted mirrors irregular cabinetry halos plastic looking materials excessive sharpening exaggerated reflections or geometry drift the final image should look like a professionally photographed completed version of the exact bathroom elevation shown in the source drawing with the source geometry fully preserved