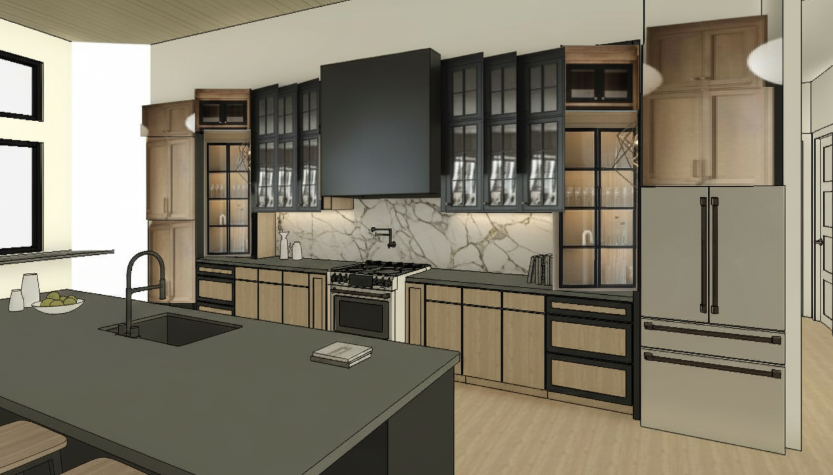
here is the comprehensive plan to elevate this concept into a photorealistic masterpiece phase 1 proportional accuracy spatial correction the current image suffers from distorted perspective particularly in the upper right cabinetry and the floating nature of the glass cabinets to fix this in the 3d model grid alignment snap all base and upper cabinets to a strict architectural grid the upper glass front cabinets flanking the hood must be perfectly plumb with the base cabinet outlines depth correction the refrigerator housing far right appears flat ensure the fridge surround is pulled forward to a standard 25 30 depth allowing the counter depth fridge to sit flush with the cabinetry island proportions the island currently looks slightly skewed ensure a standard 36 height the overhang for the seating area bottom left should be precisely 12 to 15 to look structurally sound and realistic hood scale the hood is currently a massive flat block give it subtle tapers or architectural reveals at the bottom edge to give it weight and purpose rather than looking like a pasted rectangle phase 2 physically based rendering pbr material specifications to achieve true photorealism we must move away from flat colors and use pbr materials with albedo roughness and normal bump maps 1 the black elements hood upper lower cabinets finish matte black fenix ntm or a high end matte painted wood 3d parameters albedo very dark charcoal not absolute black rgb 20 20 20 roughness 0 45 soft diffused reflections that won t show harsh glare normal map a very subtle orange peel texture to simulate sprayed cabinet paint execution linking the material nodes for the hood and the black cabinet frames will ensure 100 color and reflective consistency under all lighting conditions 2 the oak cabinets finish rift cut medium to light white oak rift cutting ensures straight modern grain patterns rather than the arching cathedral patterns of cheap oak 3d parameters albedo warm natural tan wheat roughness 0 35 satin polyurethane finish bump map follows the grain lines to catch micro shadows 3 the backsplash finish honed calacatta gold marble 3d parameters add a slight subsurface scattering sss node to the marble to give it that authentic slightly translucent depth characteristic of real stone the veining should feature thick organic grey strokes with subtle warm gold undertones to bridge the black cabinets and the warm oak 4 countertops finish matte charcoal soapstone or honed dark quartz to ground the island and perimeter contrasting beautifully against the white marble backsplash phase 3 advanced lighting atmosphere lighting is what separates a basic 3d model from a photorealistic image global illumination hdri use an overcast or soft morning hdri environment map outside the windows left this will cast soft diffused natural white light across the island and reflect gently off the glass cabinet doors artificial fill lighting under cabinet lighting add invisible led strip lights color temperature 3000k warm white tucked under the upper cabinets this will wash down the calacatta marble highlighting the veining and creating a cozy high end atmosphere interior cabinet lighting place soft low intensity point lights inside the glass front cabinets to highlight the glassware and add depth to the dark frames