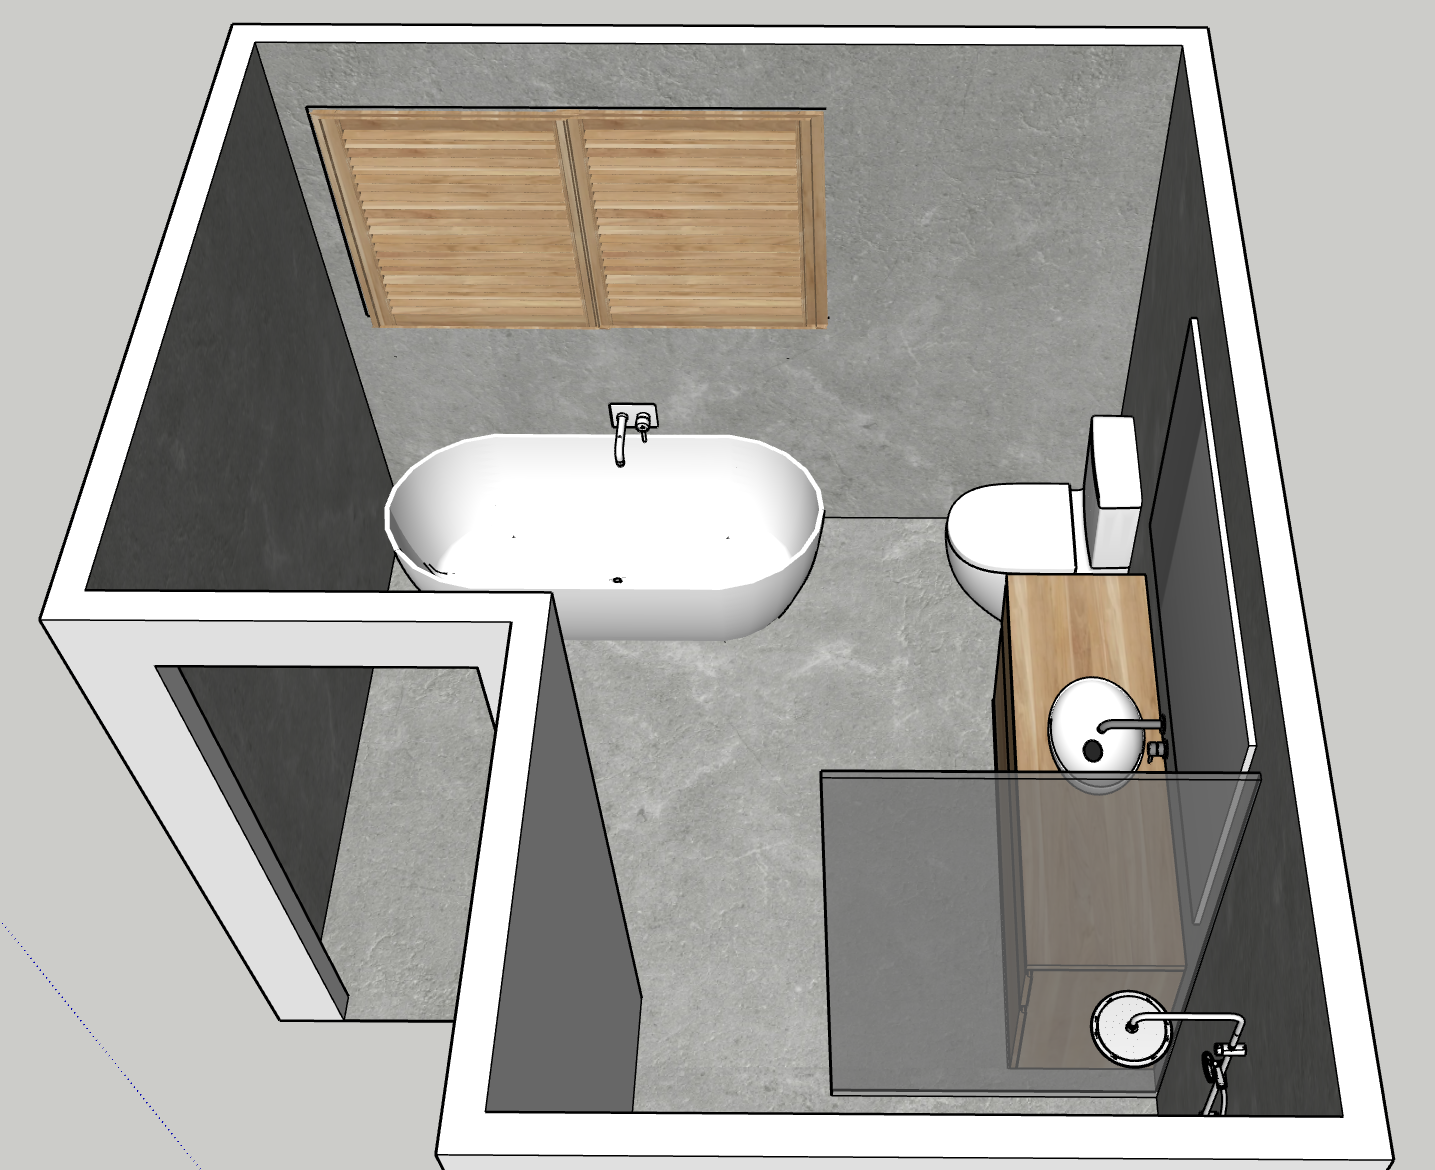
modernist interior from the top create an ultra photorealistic high end architectural interior render using the supplied bathroom model as the exact reference the result should look like a professionally photographed completed contemporary bathroom with realistic materials beautiful natural daylight and sophisticated understated styling critical preserve the existing design room layout architecture dimensions camera angle perspective and all fixture locations exactly as shown in the original model do not redesign or rearrange the bathroom only improve the realism materials lighting and specified styling elements below 1 lighting and atmosphere create soft natural daylight entering through the timber shutters above the bathtub open the shutters further than they appear in the reference image with the timber slats angled to allow more natural light into the room the light should filter naturally through the shutters creating subtle realistic striped shadows and beautiful soft highlights across the bathtub tiled walls and floor use physically accurate daylight global illumination realistic ambient occlusion and soft shadow transitions create a warm calm and luxurious spa like atmosphere the lighting should feel natural and gently diffused with balanced exposure realistic contrast and sufficient brightness throughout the room avoid overly dark corners harsh sunlight blown out highlights excessive yellow colouring or artificial looking illumination 2 wall tiles all existing grey wall surfaces are tiled including the walls surrounding the bathtub toilet vanity and shower use large format tiles in a light neutral grey with a subtle natural stone texture the colour should be a refined soft mineral grey with a slight warm neutral undertone include very subtle tonal variation and realistic surface detail without strong veining dramatic patterns or a polished finish use fine understated grout lines and realistic tile proportions to create a clean contemporary appearance the wall tiles must be noticeably lighter than the floor tiles maintain a clear elegant contrast between the two surfaces while keeping the overall palette cohesive and neutral 3 ceiling render the ceiling in a slightly lighter neutral grey than the wall tiles with a very subtle fine textured finish it should feel soft and understated complementing the stone look tiles without appearing stark white or excessively warm maintain the original ceiling height edges and architectural form 4 floor tiles distinctly darker than the walls replace the appearance of the existing floor with realistic 600 x 600 mm square tiles in a medium to dark charcoal grey noticeably darker than the light grey wall tiles the floor should have a sophisticated natural stone or fine concrete texture with subtle tonal variation a matte finish and realistic surface depth avoid a flat uniform grey colour or an overly rough heavily mottled texture clearly show the 600 x 600 mm tile format through correctly scaled fine grout lines ensure the tiles are square and consistently laid with realistic perspective and appropriate alignment within the room the darker flooring should anchor the space and create contrast against the lighter walls white bathtub and sanitaryware and warm timber vanity important colour direction light neutral grey walls slightly lighter neutral grey ceiling and distinctly darker charcoal grey floor tiles do not make the floor and walls the same colour or brightness 5 timber shutters and natural light retain the existing timber shutters above the bathtub in their exact location and original dimensions adjust the shutters so they are more open allowing more daylight to enter the room keep the natural timber slats clearly visible with realistic grain warm natural oak or honey toned colouring and detailed timber frames the shutters should look like real timber rather than a flat computer generated texture their interaction with the daylight should create gentle believable patterns of light and shadow do not enlarge or relocate the window 6 freestanding bathtub retain the existing freestanding white bathtub in precisely the same position orientation shape and proportions as the original model render it with a realistic matte or soft satin white solid surface finish subtle highlights gentle reflections and natural shading that accurately describes its curved form ensure the bathtub remains a prominent feature with realistic edges depth and contact shadows where it meets the floor retain the existing wall mounted bath tapware in its original position and finish render the metal with realistic reflections and fine detailing 7 tall indoor plant correct location is essential add one elegant taller indoor plant in the corner between the bathtub and the left hand wall on the opposite side of the bathtub from the toilet and vanity position the plant discreetly in the available corner beside the bath against the left hand wall as viewed from the current camera angle it must not be placed beside the toilet behind the toilet or in the corner between the bath and the toilet choose a refined naturally shaped plant with slender branches and soft green foliage such as an indoor olive tree or a similar tall airy architectural plant it should add organic softness natural colour and height without overwhelming the room place it in a simple understated cylindrical planter in warm off white pale stone or muted greige use realistic foliage with natural variation delicate leaf detail and believable shadows ensure the plant fits naturally within the available space without obstructing the bathtub taps window access or circulation it should look intentionally styled as part of a professionally designed bathroom 8 timber vanity and cabinetry preserve the existing timber vanity including its dimensions position shape and cabinetry arrangement enhance the timber with realistic natural grain subtle tonal variation and a warm refined oak finish the timber should have tactile depth and a high quality furniture finish without looking excessively orange glossy or artificial maintain the existing basin tapware and all other vanity details in their exact positions 9 toilet shower and fittings preserve the existing toilet shower enclosure shower screen shower fittings basin tapware and all other fixtures in their current positions and orientations render the sanitaryware in realistic clean white ceramic or solid surface materials with subtle reflections accurate proportions and natural shadows render the shower glass as genuinely transparent glass with realistic reflections and restrained edge highlights keep the existing glass panels and framing exactly as modelled ensure all metal fittings have believable material finishes and realistic reflections do not add or remove fixtures change their style or alter the layout 10 overall rendering quality produce a premium photorealistic architectural interior image with physically accurate materials and realistic surface textures soft natural daylight entering through the more open timber shutters realistic global illumination ambient occlusion and contact shadows subtle reflections on the bathtub glass and metal fittings natural timber grain and refined stone look tile finishes fine accurately scaled grout lines a clear tonal contrast between light grey wall tiles and darker charcoal grey floor tiles balanced exposure realistic colour grading and natural depth a restrained palette of neutral greys warm timber crisp white sanitaryware and soft green foliage the finished image should resemble a high end interior photography shoot for a contemporary residential bathroom with a calm sophisticated and timeless aesthetic final instructions do not deviate from the reference 1 preserve the exact original bathroom layout architecture proportions and camera viewpoint 2 make the floor tiles distinctly darker than the wall tiles 3 use 600 x 600 mm square floor tiles with fine grout lines 4 keep the ceiling a slightly lighter neutral grey with subtle texture 5 open the timber shutters further to allow more soft natural daylight into the room 6 place the tall indoor plant in the corner between the bathtub and the left hand wall opposite the toilet and vanity 7 retain all existing fixtures fittings cabinetry and shower glass in their original positions 8 do not introduce additional furniture decorative accessories wall niches lighting fixtures or architectural changes 9 prioritise photorealism accurate materials and natural lighting over stylisation final result a realistic beautifully lit contemporary bathroom with light grey stone look tiled walls distinctly darker charcoal grey 600 x 600 mm tiled flooring warm timber shutters and vanity and a tall elegant plant beside the bath on the left hand side architecture